Music metadata is the most important topic in music. Without it, you won’t get paid or credited for the hard work that you do.
Everyone is focused on TikTok, Instagram, Facebook ads, and Spotify playlisting.
All of these platforms have one thing in common: Metadata. Without it (or with the incorrect metadata), musicians wouldn’t be able to collect royalties because none of these platforms know who actually owns the song.
If monetizing your music is the goal you’ll certainly want to understand exactly how metadata works and why it’s so incredibly important.
TikTok, for example, has 1 billion active users every month, according to Backlinko. That’s 1/7th of the world’s population. With hundreds of thousands or millions of those monthly active users creating content and using different kinds of music, the game of Where’s Waldo becomes a dark reality.
But you don’t have to play Where’s Waldo. With the correct metadata embedded within your music these social media platforms and streaming services will know exactly who owns every track, which means they’ll know exactly who to pay.
Think of metadata like your car’s registration. If your car is stolen and not registered, nobody knows who owns it and who to return it to. The registration of your car contains its metadata.
In this article we’re going to break down every piece of metadata that you need to include in every one of your releases.
If you’d rather watch or listen to The Vana Room’s podcast episode on music metadata, check that out below.
What is music metadata?
Metadata is pieces of information that become embedded into each recording and composition, such as the genre, BPM, ISRC/ISWC, publisher, and singer-songwriter credits. It’s vital that all of this information is correct because again, with incorrect metadata, you and the other authors may not get paid.
This metadata is also used for ID’ing your releases in the digital world. It’s how everyone knows who to pay. It’s how song recordings are tracked through the DSPs. It’s how it’s accounted for in the dreaded algorithms. These algorithms send back analytics to your distributor to show how your music is performing on their service. This data will assist you in developing a detailed, heavily informed marketing plan.
Since Jamvana is a preferred partner with Spotify, we have every field of metadata that you’ll need to successfully distribute your music to their service.
Lastly, metadata is used to receive credit for the music you worked on. You can list the arranger, composers, lyricists, artists, producers, engineers, the studio it was recorded at, and more. We’ll get into that later in this post, but always give credit where credit is due. We all succeed this way.
Here’s a detailed list of every piece of metadata you’ll need to distribute and collect your music royalties
If you’re able to, watch the YouTube video embedded above. Bookmark it and save it as a reference. Rob, Jamvana’s CEO, screen shares and goes through the Jamvana backend and discusses each metadata field. It’s worth noting that this information isn’t specific to Jamvana, either. Every distributor will have these fields for you to fill out in one way or another.
Spotify Artist ID
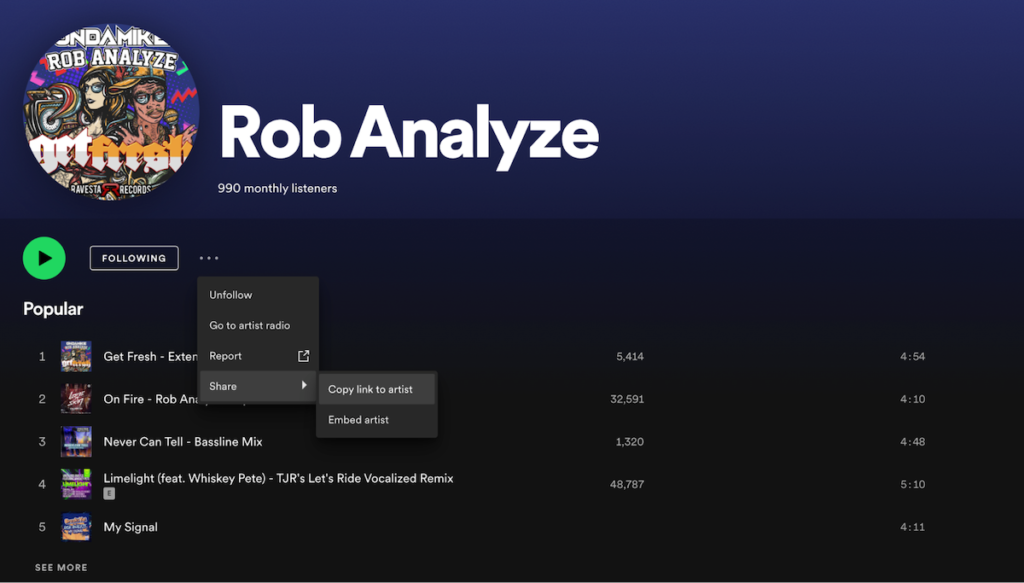
Your Spotify Artist ID is a specific number that Spotify assigns to each artist account. You can get this number by going to your Spotify for Artists account or through the Spotify application on desktop. Jamvana uses this information to ensure that your music is distributed to the correct Spotify account.
This can be retrieved directly on Spotify’s desktop application.
Artists and Artist Name
Enter the artists that worked on the release. Make each and everyone of their names are spelled correctly. If not, they may not show properly on their artist profiles.
Primary Artist
This name is the primary artist list on the DSPs. Enter your artist name. This is where you get credit. If you’re the only one that worked on the release, you will enter your name here and leave the artists and artist name field blank.
Featured and Featuring Artists
This is when an artist is featured on the song. If another artist wrote a verse for your project, they can be featured artists. This makes sure that they receive credit on the track and it shows up on their artist pages in the DSPs.
Remixer
If this track is a remix, enter the remixer’s name here. If Dua Lipa wrote a song and Calvin Harris remixed it, Harris’s name would go in this field. By entering this information the track will show up on Dua Lipa’s artist page because she’s the original artist. It will also show up on Calvin Harris’s page.
You will need to upload separate tracks for the original and remix. These are two completely different recordings.
Composer
A composer is another fancy word for a songwriter. This field is where you enter the names of anybody that helped you compose or write the track. Was it just yourself? Was it someone else? Was it cousin Eddy?
If there are no other songwriters and just you, enter your name.
Actor
This term is a bit dated, but this is essentially the project manager for the project. It can also be the producer.
DJ Khaled is known for this. I’m sure you’ve heard him shout “We Da Best Music” on numerous tracks. Since he’s the one that brought the artists on the track together, his name could be entered into the actor field.
Orchestra
The orchestra is an interchangeable term for a band, like Green Day or No Doubt. Enter that information in this field.
If this release was a No Doubt track the orchestra field would contain the members of No Doubt: Gwen Stefani, Tom Dumont, Tony Kanal, and Adrian Young. If an actual artist performed on the track, then the orchestra’s name would be entered here.
Lyricist
The lyricist is the person who wrote the lyrics of the song. Enter their names here.
Release Title
This is the title of the release. It can be a single, EP, album, or compilation. If this is a single, it would be the title of the single, like “Don’t Speak.” If it’s an EP or album, this would be the title, like Tragic Kingdom.
Label
Enter the label’s name here. If you don’t have a label, you can use your artist name or make up a label name, but be consistent about this. It’s not recommended to enter a different label for every release. Jamvana allows for multiple labels and profiles for those labels.
You are able to update the label information if, for example, six months after the release you create a label and want the track to show it was released under that. We don’t recommend it because it can cause messy metadata, but it is an option.
Artwork
Upload the track’s artwork here. We recommend 3000×3000 and 300 DPI to prevent any issues with the DSPs. Every DSP is different. Some ask for 1500×1500. Some ask for 2000×2000.
It’s important to note that you must own the rights to upload this cover art. Do not grab a random picture from the internet and use that. That’s copyright infringement, and you may find yourself in a lawsuit.
Catalog Number
This is a number that you can use to keep yourself and your label organized. The catalog number is common if you’re releasing through a label. This is a good indicator for how much volume you have and which release it is in the label’s catalog.
In Rob’s example, he uses BOMBEATZ001, which is his label name. If this was Bomb Beatz’s 40th release then Rob could enter BOMBEATZ040, and so on.
Genres
The genre’s information is used by service providers and users to filter the music they’re listening to. BPMs also play a key role in how this is categorized. For example, adding “ambient” as your primary genre when it’s better suited as a bass house track makes it difficult for DSPs and users to find. Additionally, listeners of bass house music may not necessarily be looking for ambient music or interested in ambient music, so you may be capping the potential of the release by using the incorrect genre.
If you’re distributing to a boutique shop like Beatport, Juno, or Traxxsource, the main genres are always going to go in sub genres. Their main genres are sub genres.
Release Type
The release type indicates if the release is a single, album, EP, or mix.
A single would be one to two tracks, like “Old Town Road.” An album would be Homework by Daft Punk. A DJ set would be a mix. You can have three to eight tracks for an EP, and nine to 19 tracks for an album.
UPC
UPC stands for “universal product code.” This is an identifying code that is attached to a product. This can be for a single, EP, or album. This is different from your ISRC. ISRC is for individual recordings.
For example, Daft Punk’s Homework album has one UPC. Each track on that album will have an ISRC. The UPC shows that each of the tracks on the album are part of one project.
You can get your own UPCs or have your distributor issue them. Jamvana provides them for free.
Release Dates
This is the day you want your release to become publicly available on all DSPs. It’s best to pick a date at least three weeks out. If it’s a bigger release and you need more time to market, we recommend at least 2-3 months.
Copyrights
This field indicates who owns the master recording. Jamvana’s system will automatically default it to the record label. If you don’t have one, it would be your artist name.
It’s important to have an agreement with the label and other producers (if any) so you can properly enter the correct copyright holders.
Price Tiers
This is for iTunes. Before subscriptions to services like Apple Music and Spotify, users would have to pay for each individual track, which included $0.69, $0.99, and then $1.29. Apple also allowed artists to offer exclusives to make a little more revenue or sell cheap so you can go for volume.
Jamvana’s system will default to $0.99.
Explicit
If your music contains explicit content, such as swear words, then you’ll need to indicate that here. If your music has swear words and you don’t indicate this, DSPs may flag your release and could result in your music being removed from their service.
Description
Use this field to describe the track or project. Tell a small story about the track. The DSPs use this information for playlisting and feature opportunities.
This concludes the release information. It’s a good time to stop and go back and quadruple check that all of the information you’ve inputted is spelled, dotted, and crossed correctly.
- Artwork: Make sure it’s uploaded and formatted correctly and that you own it.
- Release date: Ensure your release date is correct.
- Explicit: Make sure your release is marked explicit if it has “naughty words.”
- Credits: Check spelling for your lyricists, composers, producers, mixing/mastering engineers, etc.
- Release title: Check that your album, EP, or single is spelled correctly.
Do not put the version of the track in the title! This is poor metadata, and your track will get flagged.
Don’t:
My Signal (Rob Analyze VIP Remix)
Do:
My Signal
The remixer or version is noted in the “remixers” field and will automatically be added.
Track Level Metadata
Version
This is where you’ll enter which version of the track it is. If you had a remixer, then this is where you’ll enter that information. From the above example, you would enter “Rob Analyze VIP Remix” here, and the DSPs will show it.
ISRC
ISRC stands for “International Standard Recording Code,” and is essentially your track’s social security number. It’s the identifying code for the individual recordings and is different than the UPC.
So, if you have an album of 12 tracks, each song on that album will need an ISRC to properly be identified.
Typically your distributor will supply your ISRCs. If not, you can purchase your own here.
Album Only
You can indicate whether you want your track to be sold individually or only with the album.
Territories
Select which territories you want your music available in. If you don’t want your music in a specific territory, deselect it.
Jamvana recommends releasing worldwide so your music is the most accessible, but this is entirely up to you.
Stores
You can indicate which digital service providers you want your music available in. There are most likely going to be stores that you’ve never heard of because some countries have their own service providers and don’t have Apple Music or Spotify.
Jamvana recommends distributing your music to all of the stores, similar to territories, so your music is most widely available.
We are constantly striking deals with new service providers and we’ll automatically add your music to new stores as they become available.
Exclusive Stores
As part of your marketing plan, you may want to offer your release to a specific store ahead of the actual release date. You’ll note that in this field. This may improve your chances in feature support from the store since they’re getting exclusive access for a specified amount of time before the actual release date.
For example, if you’re pushing a release heavily on Beatport, you can give them an exclusive for two weeks prior to its release on other services.
iTunes Pre-Orders
An iTunes pre-order is an option that allows listeners to pre-order a track ahead of its release. Once the product is released, it will immediately be added to their account. This is common with DJs in case they forget to purchase the product on release day.
Audio File
Upload your high quality audio file here. Most distributors will ask for a 16-bit, 44.1kHz WAV file since this is CD quality and is currently an industry standard. Some distributors may ask for a 24-bit, 48kHz.
It is important for you to submit the audio file the distributor is asking for so your music gets released in the highest available quality.
It is not recommended to distribute an MP3 file. If provided the option between MP3, WAV, AIFF, or FLAC, we recommend either an AIFF or the standard 16-bit, 44.1kHz WAV file.
Conclusion
Metadata is a commonly overlooked step. Most musicians don’t understand its importance until they understand how their music is tracked (or not) and the bank account remains dry.
We’re here to help music professionals and artists understand the inner workings of music distribution so they can maximize the revenue on their art. If you want to get your music distributed to all of the major music services, get started with Jamvana here.
